Timeline in Unity
18 Dec 2023Timeline: A Powerful Visual Tool for Sequence Control
Official Documentation: https://docs.unity3d.com/Packages/com.unity.timeline@1.8/manual/index.html
Foreword
Timeline is a powerful visual tool in Unity for creating, editing, and managing complex cinematic sequences. It enables precise temporal control and coordination of cutscenes, animations, visual effects, and audio.
However, Timeline’s capabilities extend far beyond just creating cutscenes. At its core, it is a robust visual timeline controller that can be used to manage game flow. It allows you to execute a predetermined series of events starting from a specific moment in time. Thanks to its customizable API, the definition of an “event” is incredibly broad. For example, you could use Timeline to implement a sequence like this: When the player presses the fire button, immediately trigger a particle effect; 3 frames later, instantiate a bullet prefab; 1 second later, play the character's firing animation.
While the Animation component can achieve similar results for simple sequences, its visual editing experience is limited and less intuitive. Timeline, by contrast, is more powerful, highly extensible, allows for the reuse of clips, and features a modern, user-friendly visual editor. Furthermore, Timeline integrates seamlessly with Unity’s legacy Animation system.
Previously, achieving precise, time-based control in Unity without third-party plugins often required using coroutines or the cumbersome Animation system. The introduction of Timeline has filled a significant gap in Unity’s native feature set, making it an indispensable tool for developers.
Core Concepts
How It Works: Timeline vs. Animation
The operational model of Timeline is very similar to that of the Animation system. To use the Animation system, you create an Animation Clip asset and attach an Animator component to a GameObject to play it. Timeline follows the same pattern: you create a Timeline asset and attach a Playable Director component to a GameObject to drive its playback.
The fundamental difference lies in their design philosophy. The Animation system is tightly coupled to the GameObject that hosts the Animator. An animation is considered part of that specific object; a character’s animation should only affect that character. While it’s possible to make it control other objects, the process is often inconvenient and inelegant.
In contrast, the Playable Director component, as its name suggests, acts merely as a “director.” It is responsible for driving and managing the Timeline but does not need to be associated with the objects being manipulated. In most cases, the director does not appear in their own film. This separation gives Timeline immense freedom, allowing you to control any object in the scene from a single, centralized timeline.
Structure: Tracks and Clips
If you have ever used video editing software like Adobe Premiere Pro or DaVinci Resolve, Timeline’s structure will feel immediately familiar.
Track:
- A Timeline is composed of zero or more Tracks.
- A Track represents an infinitely long timeline, and all Tracks within a single Timeline asset share the same time axis.
- Tracks provide an organized way to manage the behaviors of multiple objects over time. For example, if you want Object A to appear at 1.0s and disappear at 3.0s, while Object B appears at 2.0s and disappears at 4.0s, you can use two separate Tracks to manage this.
- There are different types of Tracks, each defining a specific function. Unity provides several built-in Tracks, such as the
Activation Track, which controls a GameObject’s active state.
Clip:
- A Track is composed of zero or more Clips.
- A Clip is a finite block on a Track with a defined start and end time. When the timeline’s playhead enters a Clip, the Clip’s associated action is executed.
- The combination of Tracks and Clips allows for precise and parallel control over the state of various objects, helping you achieve complex sequences with ease.
Note: It is important to understand that Tracks and Clips themselves are primarily triggers for callbacks. The actual logic is executed within a
PlayableBehaviour. This concept will be explained in detail in the Custom Tracks section.
Built-in Track Types
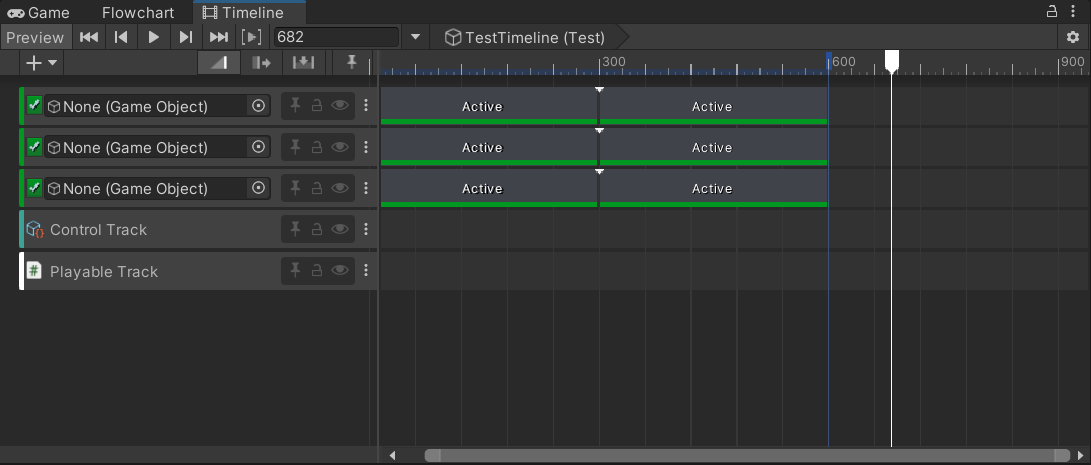
Activation Track

The Activation Track is used to enable or disable a GameObject at specific times.
A GameObject is bound to the track itself (it is recommended not to bind the Playable Director’s GameObject, as disabling it will stop the timeline). Each Activation Track can only control one GameObject. The clips on the track define the time intervals during which the object is active.
Note: Although clips are conceptually children of their track, they should not directly access the track’s data (like the bound object). This behavior is actually implemented via a
Track Mixer, which will be covered in the Custom Tracks section.
Animation Track

The Animation Track is used to play Animation Clips on an Animator controller.
An Animator component is bound to the track, and the clips on the track are Animation Clip assets. This track also implements a Track Mixer, allowing you to overlap two clips to create smooth transitions (blending) between animations and edit the blend curve directly in the editor.
Audio Track

The Audio Track controls the playback of audio.
An Audio Source component, which will play the sound, is bound to the track. The clips represent the Audio Clip assets to be played. Like the Animation Track, it uses a Track Mixer to enable smooth crossfades between audio clips, complete with editable transition curves.
Control Track

The Control Track allows you to control the playback of other Playable Directors, making it ideal for triggering nested or subsequent Timelines.
The track itself has no bound object; instead, each clip directly references another Playable Director.
Playable Track

The Playable Track is a generic track that has no built-in logic. Its purpose is to host custom clips (PlayableAssets).
This track is useful when you need to create custom behavior that only requires a clip but does not need the additional complexity of a custom track with a mixer.
Signal Track

Signals are Timeline’s built-in event system, based on the observer design pattern. If you are familiar with event centers, you will grasp this concept quickly.
To use it, you first create a Signal asset file (with a .signal extension). This asset represents the “event” itself but contains no logic; it is simply a conceptual container.
Next, you add a Signal Receiver component to the GameObject that should react to the event. In the Inspector for this component, you can bind methods to be invoked when the signal is received.
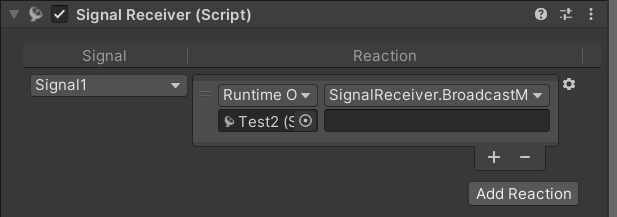
The Signal Receiver component acts as the event “subscriber.” A single Signal asset can be reused across multiple Signal Receivers.
Finally, you can add a Signal Emitter to a track by right-clicking. When the timeline’s playhead reaches the emitter, the corresponding Signal is fired, triggering all subscribed receivers.
While you can add a Signal Emitter to any track type, the dedicated Signal Track helps keep your events organized.
Critique: The Signal system is tightly integrated with the Inspector for event binding. In some cases, this can make projects complex and difficult to manage. For more advanced use cases, creating a custom event system with a custom track may be a more flexible solution.
Cinemachine Track

This track is not part of the core Timeline package; it is provided by the Cinemachine package.
It offers a powerful and convenient way to control Cinemachine virtual cameras directly from a Timeline, making it an essential tool for creating dynamic cutscenes. The details of Cinemachine are beyond the scope of this document.
Custom Tracks
Overview
We now arrive at what is arguably Timeline’s most powerful feature: its extensive customization capabilities.
Unity provides three core classes and several interfaces that allow you to create fully custom tracks: TrackAsset, PlayableAsset, and PlayableBehaviour.
All of the default tracks described above are built using this same public API. They are not part of Unity’s core engine code. This means you can find their C# source code directly in your project, which serves as an excellent set of official examples to learn from.

The diagram above illustrates the basic structure of a complete custom track (with the underlying base classes in parentheses).
-
PlayableBehaviour: This is the base class that contains the concrete logic. It provides several callback methods, such asOnBehaviourPlay(called when the behavior starts),OnBehaviourPause(called when it pauses), andProcessFrame(called every frame the behavior is active). APlayableBehaviourcan be associated with a Clip or created by a Track. -
PlayableAsset: This is the base class for a Clip. By implementing itsCreatePlayablemethod, you can instantiate and link aPlayableBehaviourto it, which allows the behaviour’s callbacks to be triggered. -
TrackAsset: This is the base class for a Track. It defines all aspects of the track, such as the color in the editor, the type of object it can bind to, and the type of clips it can contain. By implementing itsCreateTrackMixermethod, you can associate aPlayableBehaviourwith the track itself. This track-level behavior is commonly called a Mixer. The Mixer has access to the track’s bound object and the data from all clips on the track.
From an object-oriented design perspective, any logic that relates to the track’s bound object or involves blending the outputs of multiple clips should be handled in the Mixer. The default Animation Track and Audio Track are perfect examples of this, as their Mixers handle the smooth blending between clips.
Implementation Example
Here is a basic example of how to create a custom track, clip, and their associated behaviors.
Track Class (CustomTrack.cs)
namespace Timeline.Custom
{
    // Sets the color of the track in the Timeline editor
    [TrackColor(0.5f, 0.5f, 0.5f)]
    // Specifies the type of clips this track can contain
    [TrackClipType(typeof(CustomClip))]
    // Specifies the type of object this track can bind to in the editor
    [TrackBindingType(typeof(GameObject))]
    public class CustomTrack : TrackAsset
    {
        // Creates the mixer playable for this track
        public override Playable CreateTrackMixer(PlayableGraph graph, GameObject go, int inputCount)
        {
            // The mixer receives a handle to each clip on the track as an input
            return ScriptPlayable<CustomMixer>.Create(graph, inputCount);
        }
    }
}
Clip Class (CustomClip.cs)
namespace Timeline.Custom
{
    public class CustomClip : PlayableAsset
    {
        // Creates the playable behavior for this clip
        public override Playable CreatePlayable(PlayableGraph graph, GameObject owner)
        {
            return ScriptPlayable<CustomBehavior>.Create(graph);
        }
    }
}
Clip Behavior Class (CustomBehavior.cs)
namespace Timeline.Custom
{
    public class CustomBehavior : PlayableBehaviour
    {
        // Called when the playable is created and the graph starts playing
        public override void OnBehaviourPlay(Playable playable, FrameData info)
        {
            Debug.Log("Clip Behavior: OnBehaviourPlay");
        }

        // Called when the playable is paused
        public override void OnBehaviourPause(Playable playable, FrameData info)
        {
            Debug.Log("Clip Behavior: OnBehaviourPause");
        }

        // Called every frame while the playable is active
        public override void ProcessFrame(Playable playable, FrameData info, object playerData)
        {
            // Note: Per-frame logs can be very spammy.
            // Debug.Log("Clip Behavior: ProcessFrame");
        }
    }
}
Mixer Behavior Class (CustomMixer.cs)
namespace Timeline.Custom
{
    public class CustomMixer : PlayableBehaviour
    {
        private GameObject _boundObject;

        // Called when the mixer playable is created and the graph starts playing
        public override void OnBehaviourPlay(Playable playable, FrameData info)
        {
            Debug.Log("Mixer Behavior: OnMixerPlay");
        }

        // Called when the mixer playable is paused
        public override void OnBehaviourPause(Playable playable, FrameData info)
        {
            Debug.Log("Mixer Behavior: OnMixerPause");
        }

        // Called every frame for the entire duration of the track
        public override void ProcessFrame(Playable playable, FrameData info, object playerData)
        {
            // The playerData is the object bound to the track in the editor
            _boundObject ??= playerData as GameObject;
            if (_boundObject == null) return;

            // Get the number of clips currently on the track
            int inputCount = playable.GetInputCount();

            for (int i = 0; i < inputCount; i++)
            {
                // Get the blending weight of the clip at this index.
                // Weight is 1.0 if the playhead is fully inside the clip,
                // and between 0.0 and 1.0 during a blend.
                float weight = playable.GetInputWeight(i);

                if (weight > 0f)
                {
                    // Get the clip's playable
                    var clipPlayable = (ScriptPlayable<CustomBehavior>)playable.GetInput(i);

                    // Get the behavior instance from the clip's playable
                    var behavior = clipPlayable.GetBehaviour();

                    // Now you can access public properties on the behavior and use them
                    // to affect the _boundObject, factoring in the 'weight'.
                    // Example: _boundObject.transform.position += behavior.offset * weight;
                }
            }
        }
    }
}