InputSystem in Unity
29 Mar 2023Official Documentation: docs.unity3d.com/Packages/com.unity.inputsystem@1.5/manual/index.html
A First Look at Unity’s New Input System
Introduction
The Input System is Unity’s modern solution for handling user input (though it’s not that new anymore). My previous understanding of it was superficial at best. This article is a compilation of my learning notes, based on the official documentation and various online resources, on how to use it effectively. I hope you find it helpful. 😉
Installation and Setup
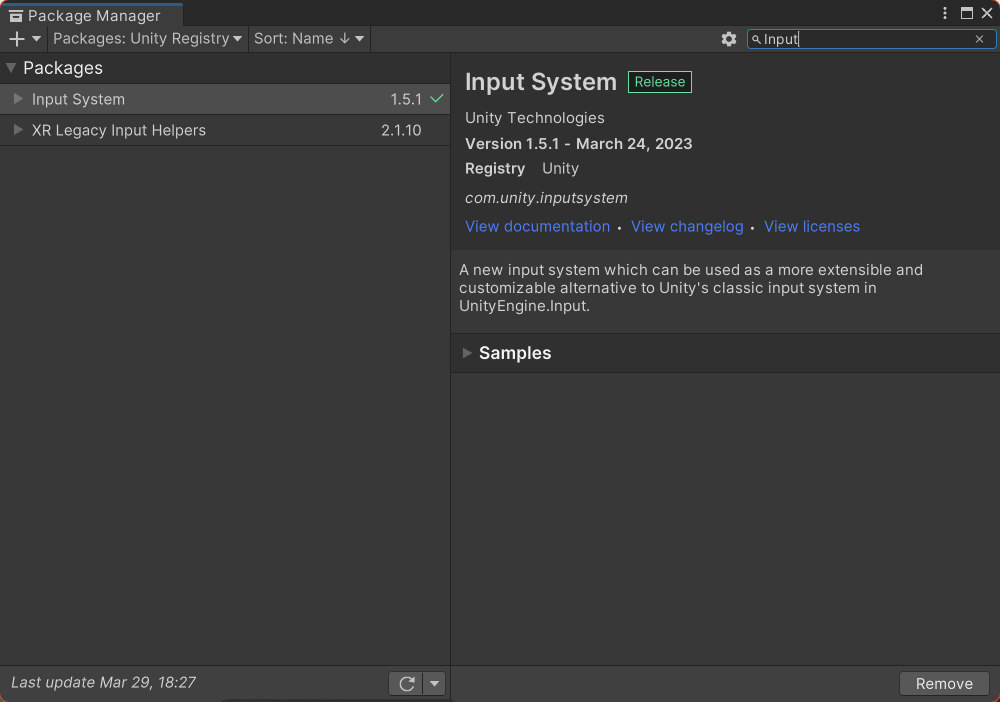
You can install the package through Unity’s built-in Package Manager (Window > Package Manager). The editor will need to restart after installation.
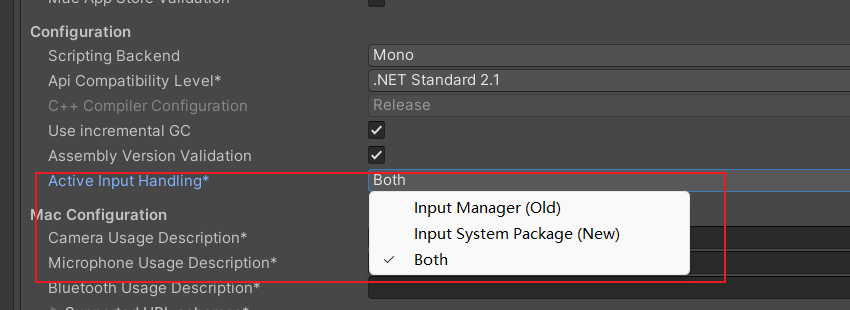
Next, you must enable the new system. Navigate to Project Settings > Player > Other Settings, and under the Configuration section, set Active Input Handling to either Input System Package (New) or Both.
The Core Concept: Actions
Actions are arguably the most important concept in the new Input System.
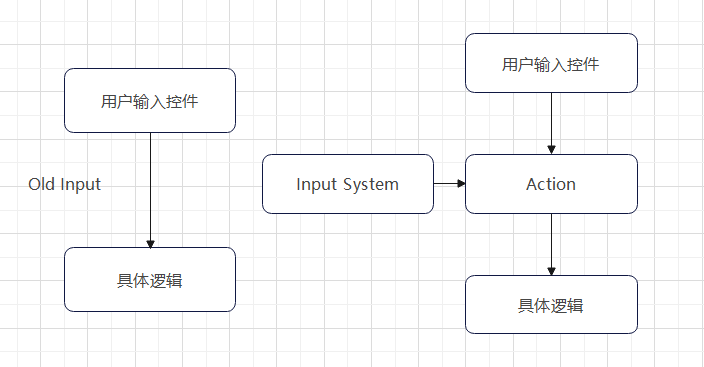
An Action is an abstraction layer that sits between raw user input and your game logic. Unlike the old Input class, where your code would check for specific key presses or button states, your code now listens to Actions.
This creates a simple but powerful workflow: Raw User Input -> Action -> Game Logic.
By decoupling input from logic, this system makes it much easier to manage controls and add cross-platform or multi-device support. For example, you can bind a gamepad’s left stick, a keyboard’s WASD keys, and even on-screen touch controls to a single Move Action. Your movement script then only needs to query the Move Action for its current value, without needing to know which device provided the input.
Creating Actions
There are several ways to create and manage Actions. Here are two of the most common methods.
1. Creating a Single Action via Serialization
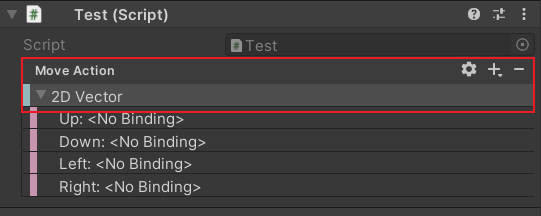
You can define an InputAction directly as a public variable in any MonoBehaviour script.
using UnityEngine;
using UnityEngine.InputSystem;

public class PlayerController : MonoBehaviour
{
    public InputAction moveAction;
}
After attaching the script to a GameObject, the moveAction will appear in the Inspector. You can click the gear icon to configure its properties and use the + and - buttons to add or remove Bindings (e.g., binding the W key).
2. Managing Actions with an Input Actions Asset
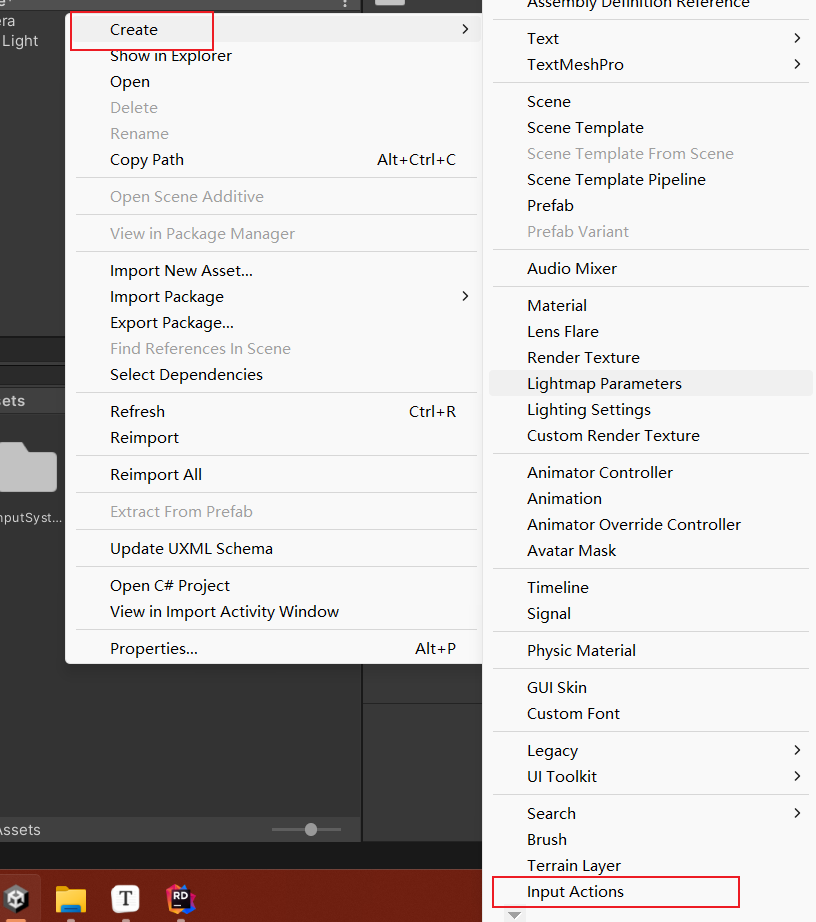
For more complex projects, the recommended approach is to use an Input Actions Asset. You can create one by right-clicking in your Assets folder and selecting Create > Input Actions.
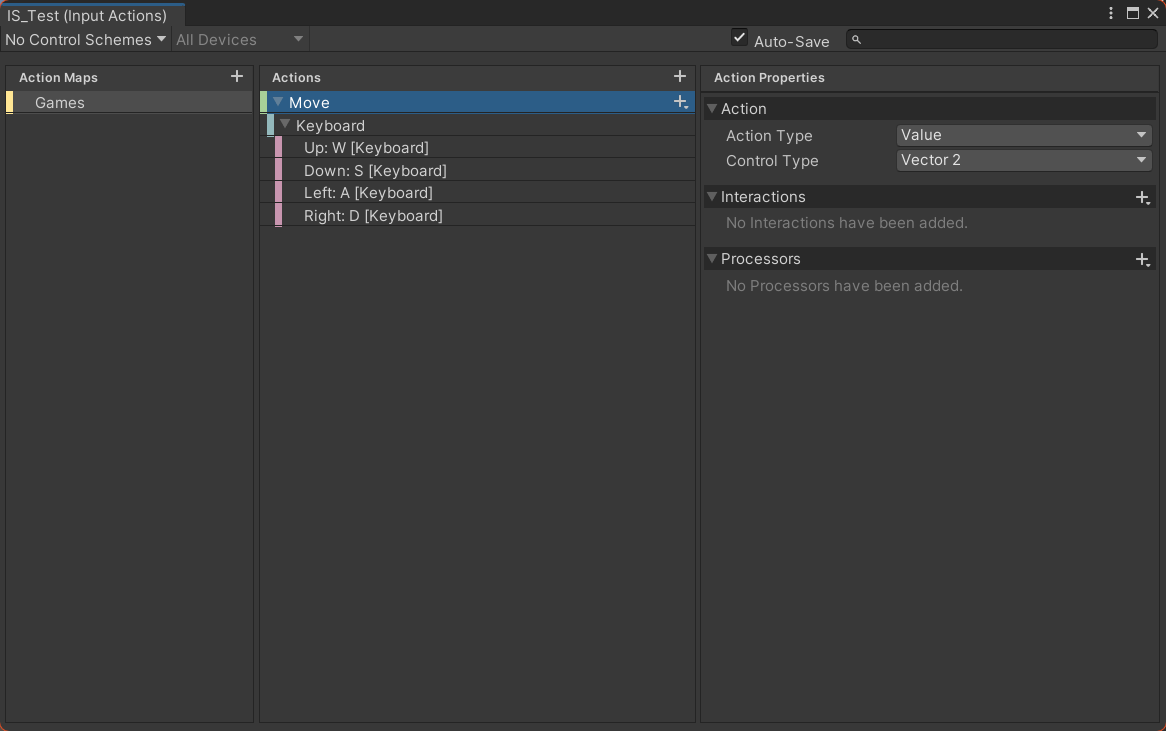
Double-clicking this asset opens a dedicated editor window. Here, you can organize your Actions into Action Maps, which are groups of Actions that can be enabled or disabled together (e.g., a “Gameplay” map and a “UI” map).
Action Properties
Each Action has properties that define how it behaves and what kind of data it outputs.
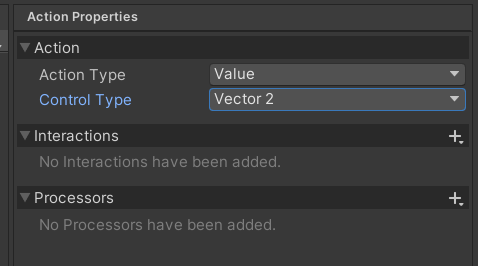
Action Type
The Action Type determines how an Action interprets input and when it triggers events.
| Value | Button | Pass Through | |
|---|---|---|---|
| started | When the value changes from its initial state. | When the button is first pressed. | When any control changes from its initial state. |
| performed | Whenever the value changes. | When the button press exceeds the defined threshold. | Whenever the value of any control changes. |
| canceled | When the value returns to its initial state. | When the button is released. | When all controls return to their initial state. |
The main difference between Value and Pass Through is that Value picks the single most active control and reports its value, while Pass Through processes input from all bound controls simultaneously.
Interactions
Interactions are behaviors that require a specific input pattern to be met before an Action is triggered. For example, you can add a Hold Interaction to an Action to make it fire only after a button has been held down for a certain duration.
Other common Interactions include Tap, SlowTap, and Press. For a complete list, see the Official Documentation on Interactions.
Binding Actions to Methods
Once your Actions are set up, you need to connect them to your game logic. This generally involves two steps:
- Getting a reference to the Action in your script.
- Subscribing a method to the Action’s events.
Here are two popular ways to accomplish this.
Method 1: Using the Player Input Component
The Player Input component is a convenient way to manage an Input Actions Asset on a GameObject.
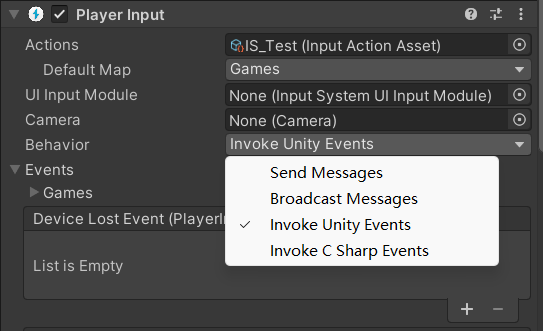
First, add the component to your player GameObject and drag your Input Actions Asset into the Actions slot. The component’s Behavior property offers four ways to trigger methods:
- Send Messages: Calls a method on the same GameObject with a specific name (e.g.,
OnMove,OnFire). This is easy to set up but is less performant due to its use of reflection. - Broadcast Messages: Same as
Send Messages, but also sends the message to all child GameObjects. This is even less performant. - Invoke Unity Events: Exposes UnityEvents in the Inspector, just like UI Buttons. You can then assign callbacks visually. This can be tedious for a large number of Actions.

- Invoke C Sharp Events: Exposes C# events that you can subscribe to from your scripts. This is the most performant and flexible option. You get a reference to the
PlayerInputcomponent and subscribe to events likeonActionTriggered.
Note: You aren’t limited to these four behaviors. You can also get a reference to the PlayerInput component, access its actions property to find a specific Action, and subscribe to its events directly. This approach is very similar to the next method.
Method 2: Generating a C# Class
For maximum control and type safety, you can auto-generate a C# wrapper class from your Input Actions Asset.
Select your asset, and in the Inspector, check the box for Generate C# Class and click Apply.

This creates a class that contains direct references to all your Action Maps and Actions. You can then instantiate this class in your script to access your controls.
Crucially, you must remember to Enable() the input actions; otherwise, they won’t work!
Here is an example script:
using UnityEngine;
using UnityEngine.InputSystem;

public class Test : MonoBehaviour
{
    // IS_Test is the name of the Input Actions Asset and the generated C# class.
    private IS_Test _inputActions;

    private void Awake()
    {
        // Instantiate the generated class.
        _inputActions = new IS_Test();

        // Subscribe a method to the 'performed' event of the 'Move' action
        // in the 'Games' Action Map.
        _inputActions.Games.Move.performed += OnMove;
    }

    private void OnEnable()
    {
        // Enable the Action Map.
        _inputActions.Games.Enable();
    }

    private void OnDisable()
    {
        // Disable the Action Map to prevent it from running in the background.
        _inputActions.Games.Disable();
    }

    // The callback method. Note that its parameter must be of type InputAction.CallbackContext.
    private void OnMove(InputAction.CallbackContext context)
    {
        // Read the value from the context. The type (Vector2) must match what
        // you configured in the Action's properties.
        Debug.Log(context.ReadValue<Vector2>());
    }
}